
Criteria 1 – Exterior Thresholds
STRUCTURAL
& DESIGNCriteria 1 –
Exterior Thresholds“How To”
Details
How To Details
Criteria 1 – Exterior Thresholds: All exterior thresholds are all flush.Exterior thresholds are the entry points to the building. The four most commonly used methods are:- slab on grade based entry thresholds
- frame based entry thresholds
- optional framing techniques for skim coat
- sliding patio doors
Foundation Slab on Grade Based Entry
The key to a SAFERhome slab on grade foundation based threshold is to create an indentation in the foundation which reserves space for the shim, weatherproofing, and threshold material. In the past, these materials were simply attached on top of the finished foundation wall, creating a tripping hazard. But, if you create a space so they can be recessed into the foundation, your threshold will be flush with the flooring and safer for everyone, from toddlers to seniors. In a SAFERhome, you are going to modify the foundation form so that a space will be reserved right when you pour the concrete.
To begin, grab your blueprints, a measuring tape, and a thick, black carpenter’s pencil, then mark where each exterior entrance will be located directly onto your foundation forms. Allow an extra inch on either side of each opening to give adequate clearance for installing your door frame and bulkhead — in other words, if your door is 36 inches wide, your measurement will be 38 inches.
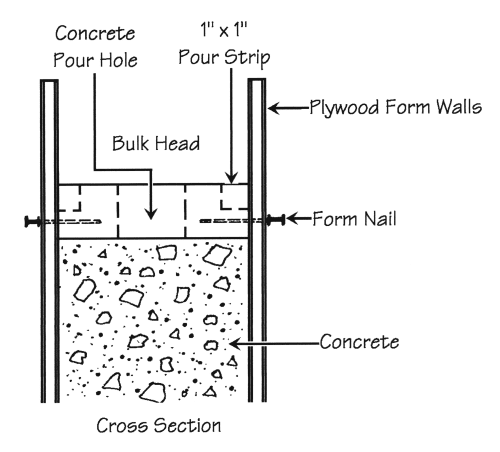
Once you have marked where the doors will be located, remove the pour strips directly below each entrance because you are going to replace them with a bulkhead that fits inside the frame itself. Pour strips are simply pieces of 1×1 inch material you’ll find nailed on the form frame’s interior walls to mark how high the concrete will be poured.
Removing them is simple — just four quick saw cuts and the pour strip sections below the doorway should pop right out.
- slab on grade based entry thresholds
- frame based entry thresholds
- optional framing techniques for skim coat
- sliding patio doors
The key to a SAFERhome slab on grade foundation based threshold is to create an indentation in the foundation which reserves space for the shim, weatherproofing, and threshold material. In the past, these materials were simply attached on top of the finished foundation wall, creating a tripping hazard. But, if you create a space so they can be recessed into the foundation, your threshold will be flush with the flooring and safer for everyone, from toddlers to seniors. In a SAFERhome, you are going to modify the foundation form so that a space will be reserved right when you pour the concrete.
To begin, grab your blueprints, a measuring tape, and a thick, black carpenter’s pencil, then mark where each exterior entrance will be located directly onto your foundation forms. Allow an extra inch on either side of each opening to give adequate clearance for installing your door frame and bulkhead — in other words, if your door is 36 inches wide, your measurement will be 38 inches.
Once you have marked where the doors will be located, remove the pour strips directly below each entrance because you are going to replace them with a bulkhead that fits inside the frame itself. Pour strips are simply pieces of 1×1 inch material you’ll find nailed on the form frame’s interior walls to mark how high the concrete will be poured.
Removing them is simple — just four quick saw cuts and the pour strip sections below the doorway should pop right out.
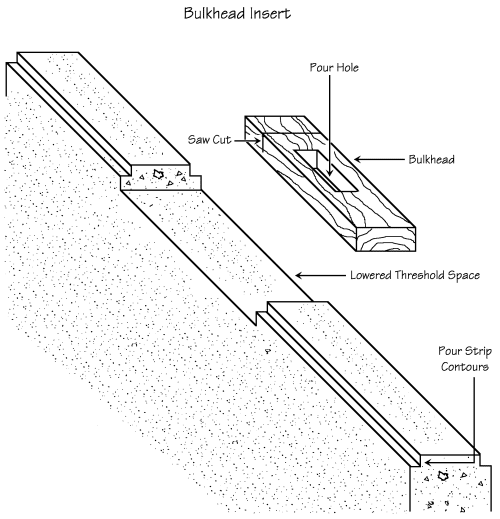
The next step is inserting a bulkhead to create the all-important recess for the threshold material which will form the door’s bottom plate. A bulkhead is nothing more complicated than a piece of 2 x 4, 2 x 6, or 2 x 8 lumber. The width of the bulkhead should match the inside width of your form framework, so the size you use in order to get a snug fit is entirely dependent upon the thickness of your foundation wall.
Just remember, once installed, the top of the bulkhead must be the same height as the top of the pour strip — it’s only purpose is to reserve space for the threshold, shims, and weatherproofing material. The best way to attach the bulkhead is still the old, tried and true method — using common or, even better, double headed nails, nailed through the outside of the form walls and into the bulkhead. One word of caution: when you attach the bulkhead, be sure to leave enough of the nail above the form surface so you can remove the nails easily once the concrete has set and you’re ready to dismantle the form framing.
Another important detail is to incorporate a crosscut into the bulkhead material. This cut should be about three quarters of the way through the material and creates a relief point so when it’s time to pop out the bulkhead you will be able to pry it out of the form with minimal chance of doing any damage to the concrete or yourself. There’s only one crosscut required.
Caution – Honeycombs, well that’s exactly what can happen to your concrete foundation if air bubbles form under the bulkhead.
Unfortunately, in a house foundation, this means loss of strength and rigidity. Translation: your wall isn’t living up to its purpose which is to support your home.
Two traditional ways of eliminating those unwanted Honeycomb-style air pockets under the bulkhead are:
• pound the sides of the forms with a sledgehammer while the concrete is being poured, or
• use a compacting machine and vibrate the concrete into place.
Cut an opening or pour hole in the centre of the bulkhead before you install it. If you’re putting in a double door or an opening greater than 48 inches in width, you will need an additional pour hole in the bulkhead to ensure even and complete distribution of the concrete mix. See diagram.
If your exterior doors open inward, it’s important they are high enough to swing without chaffing, roughing, scuffing, tearing, or otherwise marring the surface of your interior floors.
Shims are used for height adjustment and are usually made out of some type of treated wood. Since this is an area where water could potentially enter your home, use a proper sealant on both the top and the bottom surface of the shim material.
This provides a significantly better seal against water penetration than older building techniques and standards.
An acceptable alignment positions the interior finished floor surface no more than half an inch below the top of the threshold. The door can swing freely, and the extra space will permit tile to carpet, or carpet to hardwood, without adding significantly to the tripping statistics. Of course, you could always take out some of the shim, but if you have already left enough room, you won’t have to bother.
Planning an outside slope away from the threshold/door sill is also crucial, and applies to outside decks, patios, porches, verandas, and sidewalks. Check your local building codes for regulations governing the amount of slope required on outside decks and patios. Usually 2 percent of slope is ample to ensure water sheds away from the house. Or, when in doubt, a simple 1:50 ratio will allow the rain to run off. There is also the option of putting a strip or trench drain at the outside threshold of the door and that will remove all water build up issues and allow for a flatter entrance surface.
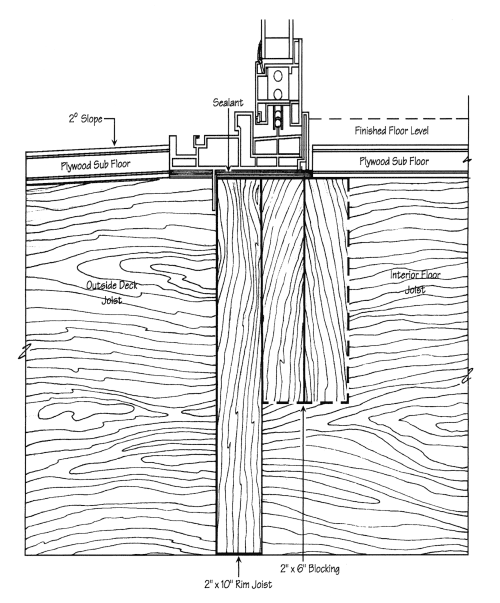
Frame Based Entry Threshold Techniques
The following is a method of removing thresholds with the frame based construction method.
Simply remove the wall’s bottom plate(s) and possibly the plywood sub-flooring below the door. This will create a recess for your threshold and allow a better than even chance it won’t get in the way during the comings and goings of daily life.
In most standard construction, a rim joist — usually built from doubled 2x10's, runs around the perimeter of the platform framing. Some plans call this rim joist a header. We will use both terms interchangeably.
First, establish the height of the interior floor finish to figure out if you need to cut out the sub flooring at the door locations where the threshold will sit. In most cases you won’t need to because the inside floor finish will be thick enough to remove the tripping hazard.
But remember, soft squishy carpet compresses, so if your 3-inch plush gets squeezed down to 1-inch, you’ve just created a 2-inch tripping hazard. And you still have to think about that allowance of 2″ more width than the size of the door being installed.
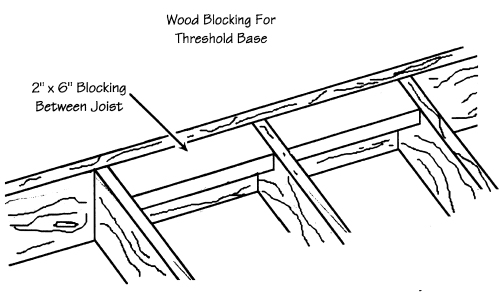
In most new homes being built, all you need to do is cut away the bottom sill plate of the wall framing in the doorway and install the door frame on the plywood flooring. If you need to go lower, then attach wooden blocking onto the rim joist between the floor joists anywhere an exterior door will be located to give the threshold something to rest on. The top of this reinforcement blocking should be flush with the top of your floor joists. Once again, make sure there’s enough clearance for your door to swing without scuffing
Optional Skim Coat
A skim coat is simply a thin covering of light-weight concrete poured on a sub floor. It’s usually used for soundproofing or to give the floor a more solid, substantial feel.
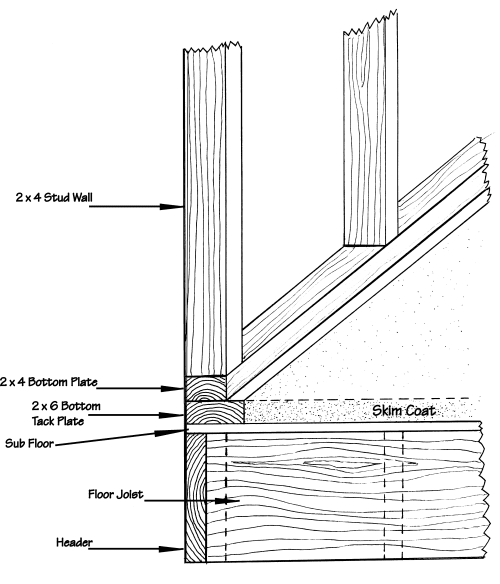
The most noticeable characteristic of skim coat construction is the use of a double bottom plate on the framed walls. The lower 2×4 or 2×6 is your shoe plate and has three purposes: it’s a marker for how thick to pour the concrete; it acts as a dam so the concrete doesn’t flow over and out of the walls; and it maintains the standard 8 foot ceiling height.
Only cut out the upper part of the bottom plate when you install your doors except in very, very unusual situations. Depending on your interior floor finish, you may decide to remove the entire double plate and then shim the door to the desired height as this sometimes gives you more adjustment options later on.
If you use skim coat construction and your interior walls are framed with 2x6's, then use a 2×8 for your bottom plate. When you’re ready to lay carpet, you’ll have solid wood to attach your tack strip to.
In some cases, when incorporating a concrete skim coat into the home design it may also be an opportunity to slightly slope or bevel the concrete skim upward as it flows toward various thresholds.
This will give you an invisible and zero transition at the doors.
To start, remove the entire bottom plate and sub floor at the door opening and build in blocking between the joists.
If you’re using a skim coat, you may decide not to cut the sub floor when you install a sliding glass door. In this case, just put the threshold on top of the plywood sub-flooring and slope the concrete up to the frame so the tripping hazard is removed.
Once you know the height of your interior floor finishing, you’ll be able to use shims to adjust the door up or down. Then simply use the standard best practices and locally approved sealing techniques.
Thresholds Recap:
- Slope the outside area 2 degrees away from the door to ensure proper run off.
- Use proper sealing techniques for the door itself.
- Pay attention to the leveling and height of your finished floor so that the door doesn't scuff and scrape the finished surface.
- If the door being installed is susceptible to weather influences and water penetration may be a problem, then install a strip or trench drain on the outside of the threshold so that water cannot build up or penetrate the doors weather stops.