
Criteria 2 – Interior Thresholds
STRUCTURAL
& DESIGNCriteria 2 –
Interior Thresholds“How To”
Details
Criteria 2 – Interior Thresholds: All interior thresholds meet minimal code constraints.
The tripping hazard threshold to the shower should be removed or lowered.
Let’s start by eliminating the threshold in the shower area. It’s been our experience that by taking the threshold out, you have just made your shower stall safer and more toe-friendly because you’ve eliminated another major tripping hazard.
This threshold removal is a simple idea which makes sense for everyone, but — and this is a big one — many threshold bylaw requirements are, sadly, out of date. Especially if you are currently able bodied and just want to design options for your future independence, safety, bylaws and building codes at all levels of government sometimes make it difficult to resolve this problem.
Typically, these codes look for a drop of approximately 3 inches for drainage in your shower area. We believe 2 inches is more than adequate, because the last thing we want to do is create another hazard by having a shower with a severe slope. Better yet, put in a trench drain and reduce the slope to 1 percent. If you install a trench or strip drain at the shower threshold and still have a main drain in the standard location then the threshold drain becomes an overflow drain just like the other CSA approved drains that are used for all sinks and tubs in the bathroom environment.
Here’s what you’ll need to do to create a SAFERhome shower:
- Drop frame the designated area of the shower stall base.
- Install trench and main drains.
- Lay in your first coat of mortar or concrete to create the base and drainage slope for the waterproof membrane.
- Install the liner/waterproof membrane.
- Lay in your top coat of mortar/concrete over the liner and produce the shape for the speed bump and proper slope to the drain.
- Install tile and grouting, and then complete your enclosure.
Step 1:
If your floor joists are 2×12, all you have to do is box frame the area to be dropped, and then finish framing in that floor space with 2×10 lumber. This is a great place to use those floor joist hangers. Just be sure you keep in mind the load characteristics of your floor as you are designing: if in doubt, call your engineer.
Step 2:
Using a router or even just a file, smooth, or round-over the top edge of the sub-floor on the inside top edge of the shower entranceway. This is to ensure that when you install the liner there are no sharp edges to potentially rip the waterproof material. This also helps to prevent your mortar from cracking at this floor transition area in the future.
Step 3:

Lay in your first coat of mortar or concrete to create the base and drainage slope for the waterproof membrane. It is important to get this first slope in place properly, because what we are doing is ensuring the slope and base are going to seal against water penetration into any inside corners or edges of the drop framed area. This is just the first of two coats, but it’s important to establish where the door to the shower and the speed bump are going to be located. This ensures the door and the speed bump are correctly aligned and can work together to create a proper seal and slope which will keep the water inside the shower area.
Step 4:
Install the liner/waterproof membrane. The only difference you’ll encounter from standard liner installation is that the liner needs to extend further out onto the bathroom floor area. This should satisfy your local inspection authority’s requirements.
Step 5:
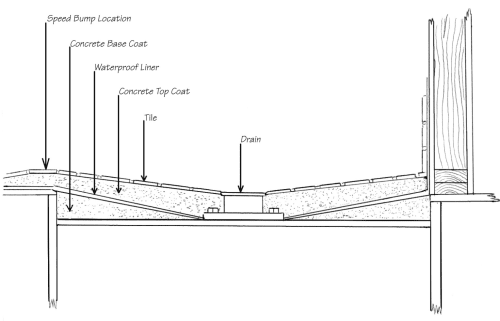
Lay in your top coat of mortar/concrete over the liner and produce the shape for the speed bump and proper slope to the drain. Keep in mind that you still need to allow for the depth of the tiles in this design so the tiles will meet up with the top of the drain properly.
You should also look carefully at the way your speed bump transitions into the shower drop area. What you need to watch out for is that the mortar/concrete has sufficient depth or thickness to it at the point where your standard height sub-floor meets up with the mortar/concrete shower base. If it is too thin at this location you may develop cracking problem later on.
The two main functions of this speed bump are to achieve a closer to code drainage drop in the shower and to provide a plateau for the swinging door to seal against. Just as in our other threshold sections, we don’t want the shower door to scrape, drag, or mar the tile surface by being mounted flush to the floor. The flat top of the speed bump works well.
Step 6:
Install your tile and grouting, and then complete the enclosure.
As you’ll find throughout this manual, we have strong rationale for reducing the threshold while keeping in mind its original purpose of keeping something, in this case water, where it ought to be.
One last consideration relates to the size of the shower facility and just how many expect to occupy it at any one time. With a little ingenuity, you can create a comfortable party-sized shower without making significant changes to the overall size of your bathroom.
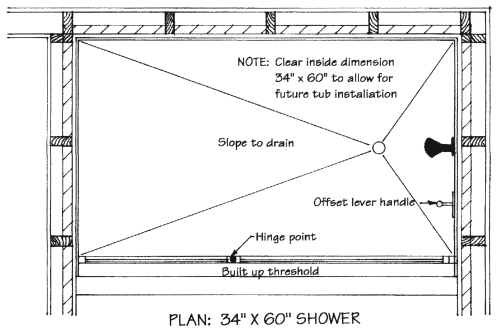
Beside is a plan of a generous shower occupying the footprint of a standard 5-foot bathtub. The floor slopes to the drain, the control lever is offset from centre, and the hinge point protects the user from becoming soaked or scalded while they adjust the shower flow.
This shower/tub option also allows for a conversion to a tub without changing the framing of the bathroom walls. Everything we’ve talked about here applies equally to a shower space which could be converted to a tub at a later date — the whole idea is to avoid making things so rigid they may affect your ability to sell or get the price you wish to get in the future.
Showers are one of the few spaces in any SAFERhome where you should be prepared to spend a little extra.
There is also another “great threshold option” and that is to install a strip or trench drain at the threshold location. This is our favorite solution due to the commonsense application of a second drain in the shower. Your bathroom sink and tub both have secondary drains to reduce the chances of water escaping the wet environment. It makes sense to have that same double drain standard applied to the shower.
This universal idea also totally eliminates any tripping hazards at the threshold of the shower and is so universal that it can also easily be used at any outside doors that are susceptible to the outside weather conditions. This type of drain will also give you the option of having less of a slope on the finished floors top layer, that controls the water flow to the drain. The less the floor slopes means less chance of a slipping or falling accident.